1. 2 most popular basic duct systems today
To install the right air duct for each factory space and each business, first of all, it is necessary to clearly understand the characteristics of the two main ventilation systems that are most commonly used today: natural air duct systems and mechanical air duct systems.
1.1. Natural ventilation system
This is a system that people can design and install themselves through devices mounted on the roof. For example, fans and vents.
This system is quite simple, cheap, easy to implement, but not professional. Usually they are used in residential spaces.
1.2. Mechanical duct system
On the contrary, the mechanical duct system is very modern and professional, requiring the installer to have good technical skills, and is often used in large spaces such as tunnels, production lines, factories, etc. During operation, the mechanical duct system will actively push out old air from the inside, while sucking in new air from the outside.

2. Standard duct installation process
Next, we will learn more about how to install air ducts. This is an extremely important operation that must be performed correctly according to the process to ensure that the system can operate for a long time without errors.
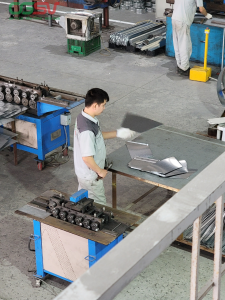
2.1. Transporting and lifting air ducts
Once the ducts are transported to the site, they will be lifted manually or by specialized lifting equipment such as pulleys and hoists to assist in bringing the ducts to the installation location.
2.2. Anti-corrosion paint
To ensure quality during installation, the duct needs to be painted with an anti-corrosion layer:
· Before spraying the primer, the duct surface must be cleaned of all dirt and rust and kept dry.
· Air ducts must be painted in a dry, well-ventilated environment. The paint film must be thin and even.
· Avoid situations such as paint residue, uneven paint, or paint that is lumpy or mixed with impurities.
· In particular, in addition to the air duct, the support brackets must also be painted with anti-corrosion paint. Note to repaint the final coat when completing the system installation.

2.3. Duct insulation
To insulate air ducts, two basic methods are needed: insulation panels and insulation wool:
· Polymer insulation panels with silver coating:
After cleaning the surface, the worker applies glue to the outside of the air duct, then cuts and sticks the insulation on top. The glue will dry after about 10-12 hours. Note, to ensure safety, all joints and connections must be covered with insulation.
· Fiberglass wool insulation with silver coating:
After the duct is cleaned, the worker will apply glue and nail it. The distance between the nails is 250-300mm. The glue will dry for about 10-12 hours. The insulation wool will be cut, then glued and stapled to the duct. Then another layer of tape will be wrapped to cover the joint.
2.4. Connecting the air ducts together
An important principle in the duct installation process: absolutely do not place electrical wires, cables, liquid pipes, or toxic or explosive gas pipes inside the duct.
When installing air ducts together, in addition to connecting with angle steel flanges, workers can connect in other forms such as: TDC and TDF flanges, sleeves, or C-shaped clamps.
Note:
· Do not install removable joints in floors and walls.
· Brackets, supports, and supports must not be hung directly on the duct flange.
· Air ducts passing through walls and ceilings must have an additional outer sleeve for protection.
· To avoid vibration, the suspended air duct must have a suitable fixing point.
· Metal parts and accessories used for ductwork must have an anti-corrosion coating.

2.5. Connect the air duct with flexible joints
When connecting air ducts with flexible joints, to avoid causing blockages inside the air duct, it is necessary to use flexible joints with adequate length, not too tight or too loose.
2.6. Connect the flexible air duct to the air outlet box
Use 20mm x 0.6mm clamp or good twist-resistant zinc wire with length suitable for the circumference of the flexible duct for connection.
Be sure to tighten the nut or wire into the round neck attached to the duct box.
2.7. Connecting air ducts and other accessories
To ensure a standard duct installation, all steps must be performed meticulously. In addition to connecting the ducts together, it is also necessary to connect the ducts with other accessories to create a complete system. These accessories include:
· Connect the air duct to the fire damper, one-way valve, and flow control valve.
· Connect the duct with the elbow and reducer fittings (similar to connecting ducts together)

2.8. How to install louvers and plenum boxes to the wall
· The louver must be mounted into an opening on the exterior side of the wall.
· The air intake box must be mounted in an opening on the inside of the wall.
2.9. Install air vent and air vent box to ceiling and wall
The air vent and air vent box need to be connected into one set and sealed with silicone. The air vent can be hung or placed on the ceiling or wall.

Above, Sao Viet Duct has shared all 9 steps in the standard duct installation process. However, after completion, it is necessary to check again to ensure the installation is effective before starting testing. Wish you success!
If you need to find a professional and reputable duct manufacturing, construction and installation unit in Hai Phong, please contact us. With the motto "Building trust with quality", Sao Viet Duct is confident that it can satisfy customers.
SAO VIET AIR DUCT MANUFACTURING AND TRADING COMPANY LIMITED
· Address: 267 Le Thanh Tong, May Chai, Ngo Quyen, Hai Phong
Hotline: Mrs. Hang 0985 239 838, Mrs. Giang: 0934 559 168
· Phone: 0225 355 5619
· Email: dieuhoasaoviet@gmail.com
· Facebook: https://www.facebook.com/dieuhoasaoviet68